When it comes to maintaining the integrity of your home, replacing damaged shingles or tiles is a crucial task that should never be overlooked. The roof is your first line of defense against the elements, and even a small compromise can lead to significant problems down the line. From leaks to structural damage, the consequences of ignoring damaged roofing materials can be costly and time-consuming. In this article, we will explore the essential techniques and best practices for effectively addressing this common issue. Whether you are a seasoned DIY enthusiast or a homeowner looking to understand the process better, our guide will equip you with valuable insights. is a crucial task that should never be overlooked. The roof is your first line of defense against the elements, and even a small compromise can lead to significant problems down the line. From leaks to structural damage, the consequences of ignoring damaged roofing materials can be costly and time-consuming. In this article, we will explore the essential techniques and best practices for effectively addressing this common issue. Whether you are a seasoned DIY enthusiast or a homeowner looking to understand the process better, our guide will equip you with valuable insights.
We will delve into the types of shingles and tiles available, the signs that indicate a need for replacement, and step-by-step instructions to ensure a successful repair. Join us as we uncover the vital aspects of replacing damaged shingles or tiles and empower yourself with the knowledge to protect your home and investment. Don't let a small issue become a major headache—read on to find out how you can take charge of your roof repair needs!Maintaining a roof is crucial for the overall integrity of a home. and empower yourself with the knowledge to protect your home and investment. Don't let a small issue become a major headache—read on to find out how you can take charge of your roof repair needs!Maintaining a roof is crucial for the overall integrity of a home.
Replacing damaged shingles or tiles
is an essential part of roof maintenance, as failing to address these issues can lead to more significant problems such as leaks, structural damage, and increased energy costs. Understanding the various types of roofing materials available is vital for homeowners considering a replacement or repair. There are several types of roofing materials, each with its own set of advantages and disadvantages.Asphalt shingles are among the most popular choices due to their affordability and ease of installation. They typically last 15 to 30 years and come in a variety of colors and styles. However, they may not be as durable as other options, especially in extreme weather conditions.
Clay tiles
offer a distinct aesthetic appeal and exceptional durability, often lasting over 50 years. They are resistant to fire and insects but can be quite heavy and may require additional structural support.The cost of clay tiles can be significantly higher than asphalt shingles, which might deter some homeowners.
Wood shingles
, known for their natural beauty, provide an attractive appearance that can enhance a home's curb appeal. However, they require regular maintenance to prevent rot and insect damage, and their lifespan is generally around 30 years. Additionally, wood shingles can be more expensive than asphalt options.Metal roofing
has gained popularity due to its durability and energy efficiency. Metal roofs can last 40 to 70 years and are resistant to severe weather conditions.While the initial investment is higher than asphalt shingles, metal roofs can save money in the long run due to their longevity and lower maintenance requirements. Inspecting a roof for damage is a critical step before replacing damaged shingles or tiles. Homeowners should look for common signs of damage such as missing shingles, leaks, or discoloration. To conduct a thorough inspection, it is important to prioritize safety; always use a sturdy ladder, wear non-slip shoes, and consider using a harness if the roof has a steep pitch. The tools and materials needed for replacement include roofing shingles or tiles, roofing nails, a hammer or nail gun, a utility knife, a pry bar, and safety gear such as gloves and goggles. Having all materials ready before beginning the project will streamline the process. The step-by-step process for replacing damaged shingles or tiles begins with removing the damaged pieces.
Carefully use the pry bar to lift the edges of the damaged shingle or tile and remove any nails holding it in place. Once removed, inspect the area for any underlying damage before placing the new shingle or tile. Align the new piece with existing ones and secure it with roofing nails. Be sure to overlap each shingle correctly to ensure proper water drainage. To achieve a uniform look when blending new shingles with existing ones, select shingles that closely match the color and style of your current roof.
Over time, existing shingles may fade due to sun exposure; therefore, purchasing a slightly different batch may be necessary to achieve the best results. Preventing future damage involves regular maintenance practices such as conducting inspections at least twice a year and after severe weather events. Cleaning gutters regularly will prevent water buildup that could lead to leaks and damage. Keeping trees trimmed away from the roof will also help reduce debris accumulation. In terms of cost estimates for materials and labor, homeowners can expect to spend between $100 to $150 per square (100 square feet) for asphalt shingles, with labor costs adding an additional $50 to $100 per square depending on local rates. Clay tiles can range from $300 to $500 per square for materials alone.
For those who prefer professional assistance, finding reliable contractors involves checking reviews online, asking for recommendations from friends or neighbors, and ensuring that any contractor selected is licensed and insured. In summary, understanding the different roofing materials available along with proper inspection techniques and replacement processes is key for homeowners looking to address damaged shingles or tiles. Timely repairs not only enhance aesthetic appeal but also protect against potential future expenses related to extensive roof damage.
Maintenance Tips for Longevity
To ensure the longevity of your roof and prevent the need for replacing damaged shingles or tiles, regular maintenance is crucial. Start by performing routine inspections at least twice a year, ideally in the spring and fall. Look for any signs of wear and tear, such as cracked, curling, or missing shingles.Early detection of damage can significantly reduce repair costs. Another vital maintenance tip is to keep your roof clean. Remove debris like leaves, branches, and moss that can trap moisture and lead to shingle deterioration. Use a gentle broom or a leaf blower to clear off the roof surface, but avoid using high-pressure washing, as it can damage shingles. Additionally, ensure that your gutters are clear and functioning properly. Clogged gutters can cause water to back up under the shingles, leading to leaks and further damage.
Regularly clean your gutters and downspouts to allow for proper drainage. Consider trimming overhanging branches as well. Tree limbs that rest on your roof can scratch and damage shingles over time, while also allowing leaves to accumulate. Keeping trees trimmed back will help protect your roof from unnecessary wear. Lastly, if you notice any signs of moisture in your attic or inside your home, address them promptly. This could indicate a problem with ventilation or leaks that need immediate attention to prevent further damage and costly repairs.
Tools and Materials Needed
Replacing damaged shingles or tiles requires specific tools and materials to ensure a successful repair.Having the right items on hand can make the process smoother and more efficient. Below is a list of essential tools and materials you will need:
- Shingles or Tiles: Ensure you have replacement shingles or tiles that match your existing roof in terms of color, style, and material.
- Roofing Nails: These are specifically designed for roofing applications and are essential for securing the new shingles or tiles in place.
- Hammer or Nail Gun: A hammer is a traditional tool for installing roofing nails, while a nail gun can speed up the process significantly.
- Utility Knife: A sharp utility knife is necessary for cutting shingles or tiles to size, especially in tight spots or when making adjustments.
- Roofing Sealant: This is used to provide an additional layer of protection against water infiltration around the edges of the new shingles or tiles.
- Ladder: A sturdy ladder is crucial for safely accessing your roof during the repair process.
- Safety Gear: Always wear safety goggles, gloves, and a harness if working on a steep roof to protect yourself from injuries.
Inspecting Your Roof
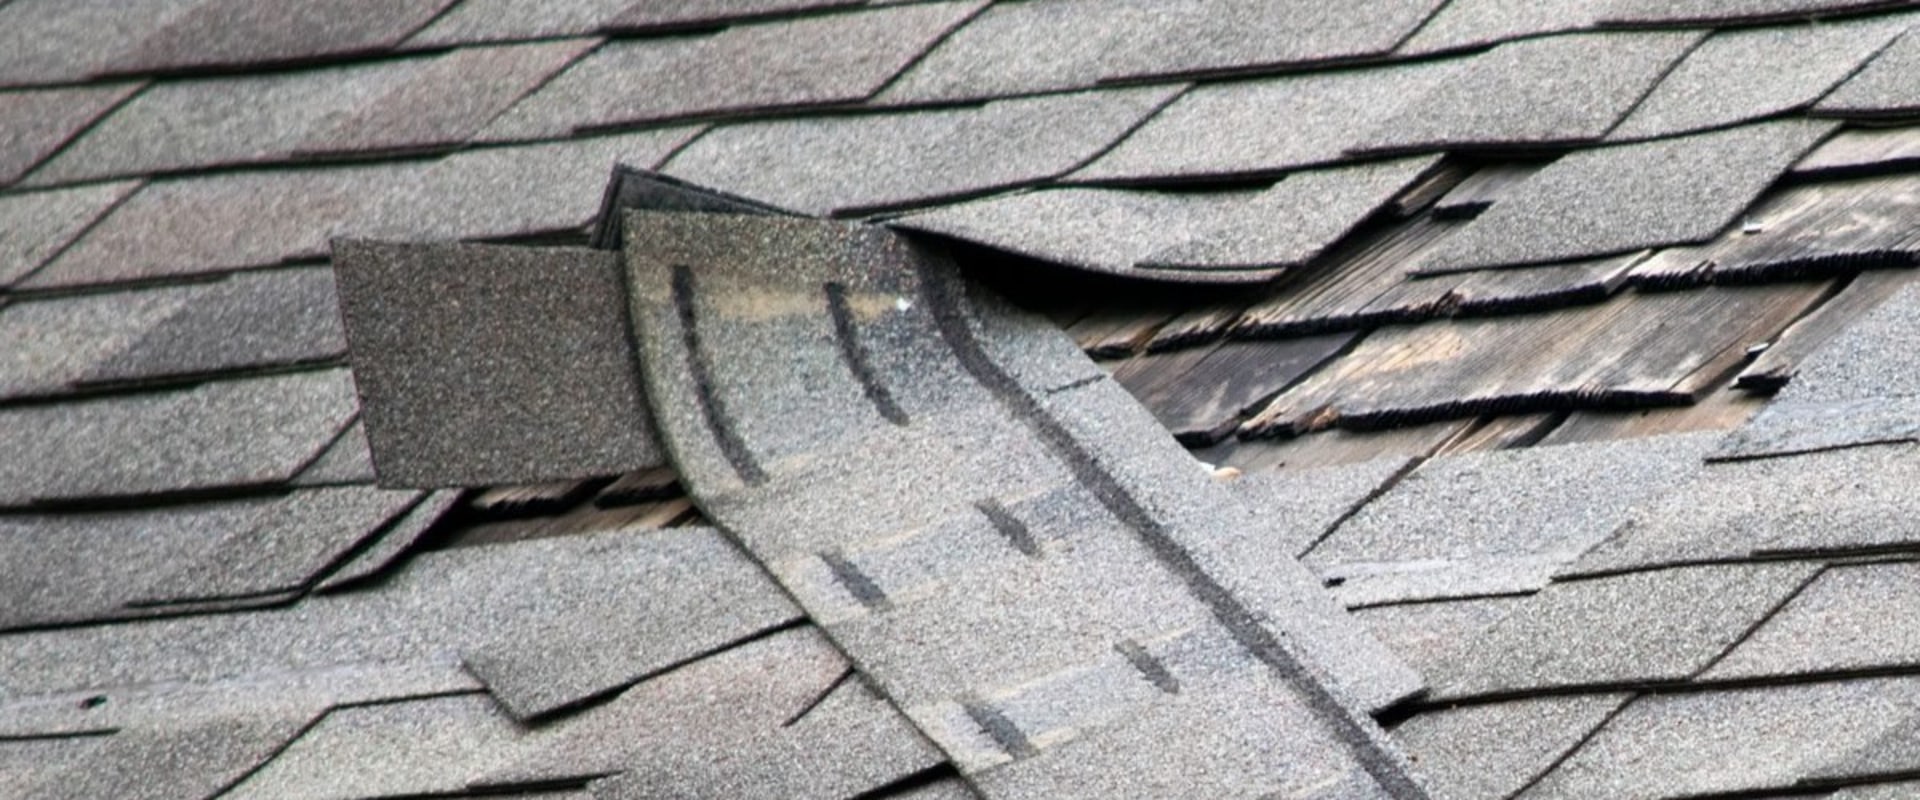
Inspecting your roof is a crucial step in identifying damaged shingles or tiles before they escalate into more severe problems. To ensure safety while inspecting, always use a sturdy ladder and consider having someone nearby to assist you. If you're uncomfortable with heights, it's advisable to hire a professional. Begin your inspection from the ground by looking for obvious signs of damage.Check for missing shingles or tiles, as well as any that appear to be cracked or curled. Take note of any areas where the roof may sag, which can indicate structural issues underneath. Next, inspect your roof for leaks. Look for water stains on ceilings and walls inside your home, as these can signal that water is penetrating through the roof. If you notice any discoloration on the roof itself, such as dark spots or streaks, this could indicate mold or algae growth, which can also damage your roofing materials. During your inspection, pay attention to the flashing around chimneys, vents, and skylights.
Damaged or improperly sealed flashing can lead to leaks and should be replaced if necessary. Additionally, check the gutters for debris; clogged gutters can cause water to back up and damage your roof. After completing your ground-level inspection, if you feel confident and safe doing so, carefully climb onto the roof for a closer examination. Look for any signs of wear and tear on the shingles or tiles, ensuring that they are securely fastened and in good condition. Keep an eye out for granules from asphalt shingles accumulating in the gutters, which can indicate significant wear. By conducting a thorough inspection and being aware of these specific signs of damage, you can take proactive steps to address issues early on, saving yourself time and money in the long run.
Understanding Roofing Materials
When it comes to replacing damaged shingles or tiles, understanding the different types of roofing materials available is crucial.Each material has its own unique characteristics that can influence your replacement choices and the overall health of your roof. One of the most common roofing materials is asphalt shingles. They are favored for their affordability and ease of installation. Asphalt shingles come in a variety of colors and styles, allowing homeowners to achieve the desired aesthetic. However, they may have a shorter lifespan compared to other materials, typically lasting around 20-30 years. Another popular option is clay tiles, known for their durability and distinctive appearance.
Clay tiles are resistant to extreme weather conditions, making them an excellent choice for areas prone to storms. However, they are heavier and more expensive than asphalt shingles, which can affect installation costs and structural requirements. Metal roofing has gained popularity in recent years due to its longevity and energy efficiency. Available in various styles, including panels and shingles, metal roofs can last 40-70 years with proper maintenance. They are also resistant to fire and pests, making them a smart investment for many homeowners. Wood shakes or shingles offer a natural look that many homeowners appreciate.
While they provide good insulation, they require more maintenance than other materials and can be susceptible to rot and insects if not properly cared for. Typically, wood roofs last about 30 years. Finally, synthetic roofing materials mimic the appearance of traditional options like slate or wood but often come with increased durability and lower maintenance needs. These materials can be a cost-effective alternative that still provides aesthetic appeal. Ultimately, choosing the right roofing material for replacing damaged shingles or tiles will depend on various factors such as budget, climate, and personal preference. Understanding these materials allows homeowners to make informed decisions that will protect their investment and ensure the longevity of their roofs.
Cost Considerations
When it comes to replacing damaged shingles or tiles, understanding the financial implications is crucial.Homeowners often face the decision of whether to tackle this task themselves or hire a professional, and each option comes with its own set of costs. For those considering a DIY approach, the costs primarily involve purchasing materials such as new shingles or tiles, underlayment, and any necessary tools. On average, homeowners can expect to pay between $0.80 to $4.00 per square foot for shingles alone, depending on the material type. Additional costs might include safety equipment and disposal fees for old shingles, which can add another $100 to $300 to the overall project. However, while DIY repairs may seem more economical at first glance, they require a significant investment of time and effort. Homeowners must also factor in their skill level and the potential risk of improper installation, which could lead to further damage and higher repair costs down the line. On the other hand, hiring a professional contractor for replacing damaged shingles or tiles typically incurs higher upfront costs but can offer several advantages.
Professional services often range from $3.50 to $7.00 per square foot, including labor and materials. This price may vary based on the contractor's experience, the roofing material chosen, and regional labor rates. One significant benefit of hiring professionals is their expertise and efficiency. Experienced contractors can quickly identify underlying issues that may not be apparent to an untrained eye, potentially saving homeowners from costly repairs in the future. Additionally, many contractors offer warranties on their work, providing peace of mind that can be invaluable. Ultimately, the choice between DIY and hiring a professional should consider not only the immediate costs but also the long-term implications for your roof's health and your home's overall value.
Finding Reliable Contractors
When it comes to replacing damaged shingles or tiles, finding a reliable contractor is crucial for ensuring the job is done correctly and efficiently.Here are some tips on how to choose trustworthy roofing contractors if professional help is needed:1.
Research and Recommendations:
Start by asking friends, family, or neighbors for recommendations. Personal experiences can provide valuable insights into a contractor's reliability and quality of work. Additionally, check online reviews and ratings on platforms like Yelp or Angie's List to gather more information.2.Verify Credentials:
Always ensure that the contractor is licensed and insured. A reputable roofing contractor should have the necessary licenses to operate in your area and carry liability insurance to protect you from potential damages during the repair process.3.Get Multiple Estimates:
Contact several contractors and request detailed estimates for the replacement of damaged shingles or tiles.This will help you compare prices, services offered, and timelines. Be cautious of estimates that seem too low, as they may indicate subpar materials or workmanship.4.
Ask for References:
A trustworthy contractor should be willing to provide references from previous clients. Take the time to contact these references and inquire about their experiences with the contractor, including the quality of work and adherence to deadlines.5.Review Contracts Carefully:
Before signing any contract, read it thoroughly to ensure you understand the terms and conditions. Pay attention to details regarding payment schedules, materials used, and the scope of work.Don't hesitate to ask questions if anything is unclear.6.
Trust Your Instincts:
Finally, trust your gut feeling when selecting a contractor. If something feels off during your interactions or you feel pressured to make a quick decision, it may be best to continue your search for a more suitable option. By following these tips, homeowners can increase their chances of finding a reliable contractor who will effectively handle the replacement of damaged shingles or tiles, ensuring their roof remains in good condition and preventing further issues down the line.Step-by-Step Replacement Process
Replacing damaged shingles or tiles is a critical task that every homeowner should be prepared for. It not only helps maintain the integrity of your roof but also prevents further damage and costly repairs down the line. Below is a detailed step-by-step guide to assist you in this process.1.Assess the Damage:
Before beginning the replacement, carefully inspect your roof to identify the extent of the damage.Look for missing shingles, cracked tiles, or any signs of discoloration. A thorough assessment will help you determine how many shingles or tiles need replacement.
2.Gather Necessary Tools and Materials:
Ensure you have all the required tools at hand. Common tools include a pry bar, hammer, utility knife, roofing nails, and safety equipment such as gloves and goggles. Additionally, purchase replacement shingles or tiles that match your existing roof.3.Remove Damaged Shingles or Tiles:
Start by lifting the damaged shingle or tile with a pry bar.For shingles, gently slide the pry bar under the edge and lift it away from the roof. For tiles, carefully remove any fasteners holding them in place. Be cautious to avoid damaging surrounding shingles or tiles during this process.
4.Prepare the Roof Deck:
Once the damaged pieces are removed, inspect the roof deck underneath. Look for any signs of rot or damage that may need attention before installing new shingles or tiles.If necessary, replace any damaged sections of the roof deck to ensure a stable base for your new roofing materials.
5.Install New Shingles or Tiles:
Begin placing the new shingles or tiles in the same pattern as the existing ones. For shingles, align them with the edges and secure them using roofing nails, ensuring they are fastened tightly to prevent wind uplift. For tiles, slide them into place and reattach any necessary fasteners.6.Seal and Finish:
After all new shingles or tiles are installed, check for any gaps or exposed nails that might require sealing with roofing cement. This helps prevent leaks and ensures a watertight seal.7.Clean Up:
Finally, remove any debris and leftover materials from your work area.Dispose of old shingles or tiles responsibly and ensure no sharp objects are left on your roof or yard. This step-by-step guide should empower homeowners to tackle the task of replacing damaged shingles or tiles effectively, leading to a well-maintained roof that protects their home. In conclusion, replacing damaged shingles or tiles is an essential aspect of maintaining the integrity of your roof. We discussed the importance of recognizing the signs of damage, such as missing shingles, leaks, and discoloration, to prevent more significant issues down the line. By addressing these problems promptly, homeowners can save on costly repairs and ensure their roofs remain in good condition. Furthermore, regular inspections and maintenance play a critical role in extending the lifespan of your roofing materials. As we highlighted, understanding the types of roofing materials, having the right tools, and following a step-by-step replacement process can empower homeowners to take control of their roof's health. We encourage you to take action today—inspect your roof regularly and don’t hesitate to contact a professional if you notice any signs of damage.
Timely repairs not only protect your home but also provide peace of mind.


