Are you tired of dealing with leaks and water damage in your home? A well-maintained roof is essential for protecting your property from the elements, but over time, wear and tear can lead to the need for repairs. Whether you’re a seasoned DIY enthusiast or a novice looking to tackle your first home improvement project, understanding how to effectively patch your roof is crucial. In this Are you tired of dealing with leaks and water damage in your home? A well-maintained roof is essential for protecting your property from the elements, but over time, wear and tear can lead to the need for repairs. Whether you’re a seasoned DIY enthusiast or a novice looking to tackle your first home improvement project, understanding how to effectively patch your roof is crucial. In this Step-by-Step Patching Techniques for Roof Repairs guide, we will walk you through the entire process of repairing your roof, ensuring that you have the knowledge and confidence to take on this important task. Roof repairs may seem daunting, but with the right tools and techniques, you can restore your roof’s integrity and safeguard your home. From identifying the source of leaks to selecting appropriate materials, our comprehensive guide will provide you with all the necessary information.
We’ll cover everything from preparation to execution, allowing you to achieve professional results without breaking the bank. As we delve into this step-by-step guide to patching a roof, you'll discover practical tips and tricks that can save you time and effort. Whether you're addressing minor issues or tackling more significant damage, our techniques are designed for durability and effectiveness. So grab your tools and let’s get started on making your roof as good as new!Patching a roof can seem daunting for many homeowners, but with the right knowledge and tools, it can be a manageable DIY task. Understanding the type of roofing material on your home is crucial since different materials require different repair methods.
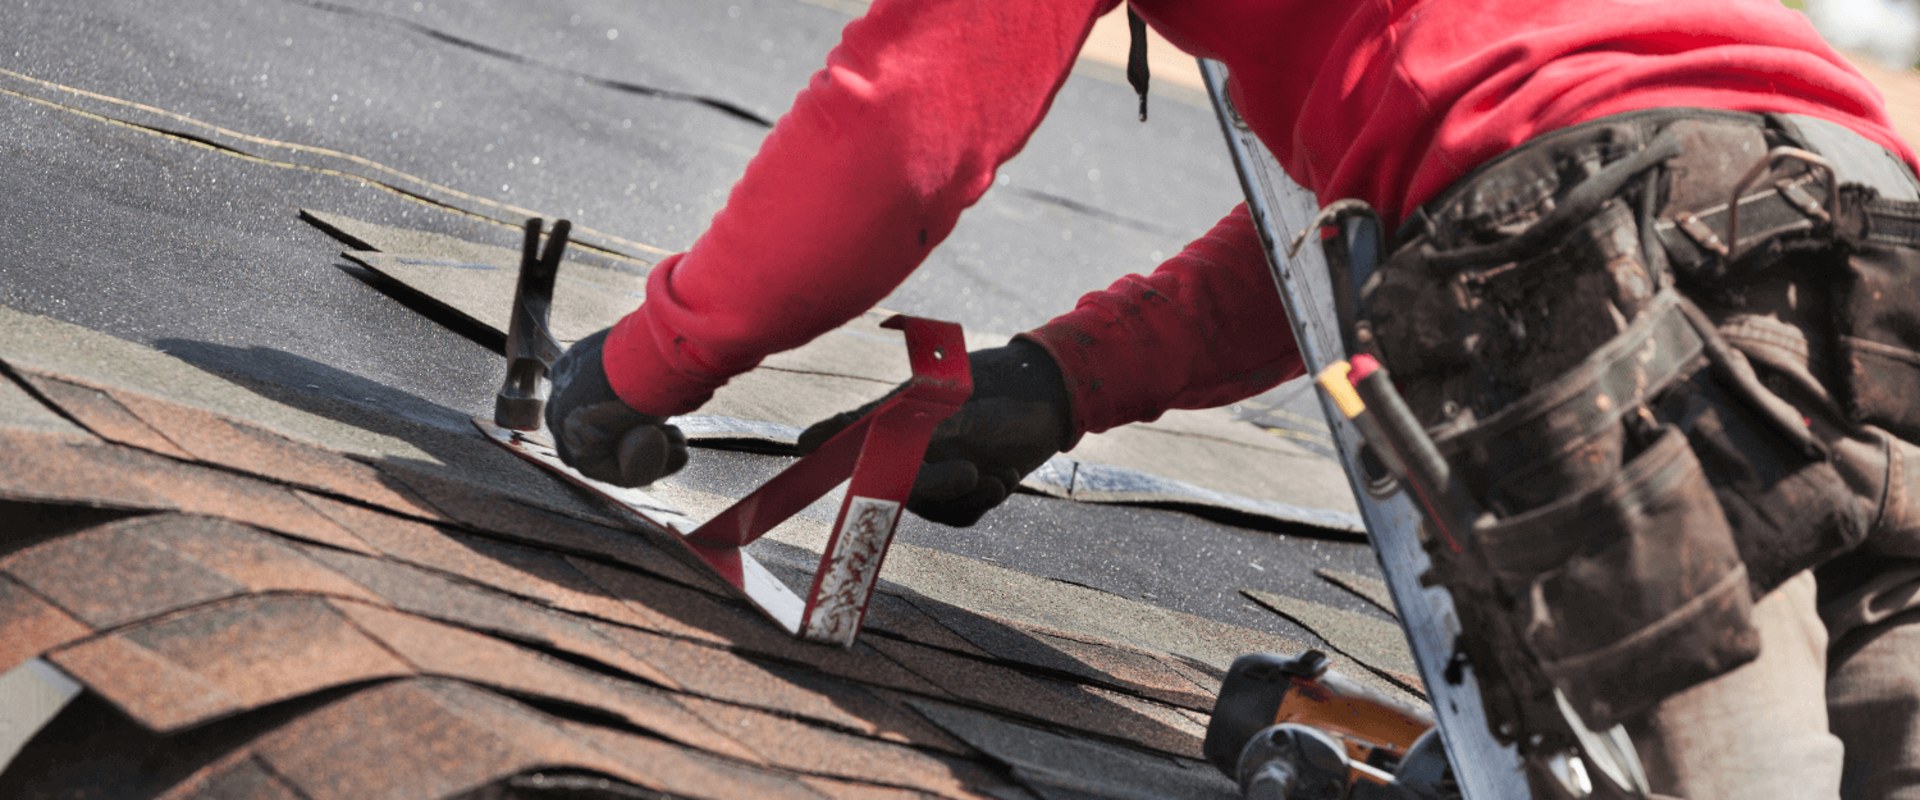
For example, asphalt shingles are one of the most common roofing materials and are generally easy to patch. If you notice a few missing or damaged shingles, you can typically replace them individually by removing the damaged pieces and sliding new shingles into place. Ensure that the new shingles match in color and style to maintain aesthetic appeal. On the other hand, if your roof is made of metal roofing, the repair process will differ. Metal roofs can develop rust or leaks at seams and fasteners.
In these cases, you may need to apply a sealant specifically designed for metal roofs, or replace panels if the damage is significant. It’s essential to know the type of metal; galvanized steel and aluminum may require different treatments. Before beginning any patching work, gather the necessary tools. Common tools include a ladder, utility knife, roofing cement, caulk gun, and safety gear such as gloves and goggles. Having a sturdy ladder is critical for safely accessing your roof.
Remember that safety should always be your priority—never attempt repairs during wet or windy weather, and consider using a harness if working on a steep slope. The first step in the patching process is identifying damage. Look for signs of wear such as curling shingles, rust on metal roofs, or visible leaks in your ceiling. Once you've pinpointed the problem area, prepare it for repair by cleaning it thoroughly. Remove debris, old shingles, or rust using a wire brush if necessary. Next, apply your patches.
For asphalt shingles, cut new pieces to size and use roofing cement to secure them in place. For metal roofs, apply a generous bead of sealant around the damaged area and place a patch over it if needed. Make sure all edges are sealed well to prevent future leaks. After applying your patches, sealing is crucial. Use roofing cement or sealant along the edges of your patches to create a watertight barrier.
This step is essential in ensuring that your repair holds up against weather conditions. Post-repair maintenance is vital to prolong the life of your roof. Regularly inspect your roof for any new signs of wear and keep gutters clear to prevent water buildup that could lead to further damage. For instance, scheduling an annual roof check can help catch problems early before they escalate into larger issues. While many homeowners can successfully patch their roofs, there are circumstances where hiring a professional is advisable. If you’re uncomfortable with heights, have extensive damage that involves structural concerns, or if your roof has multiple layers of material, it's best to consult a roofing contractor.
They have the expertise and tools to ensure repairs are done correctly and safely. Anecdotes from DIY enthusiasts highlight successful experiences with patching roofs; for example, one homeowner recounts how they saved hundreds by replacing only four missing asphalt shingles rather than hiring a contractor for an entire roof replacement. Others share stories of tackling minor leaks with a simple caulking job that held up through several storms. Ultimately, understanding the specific requirements for your roofing material and following safety precautions will make the process smoother. By knowing when to take on a project yourself and when to seek professional help, you’ll protect your investment and ensure your home remains safe from water damage.
Maintenance Tips After Patching
Once you have successfully completed the patching process, it is crucial to implement maintenance tips to ensure the longevity and effectiveness of your repair. Regular inspections are key; check the patched area for any signs of wear or damage at least twice a year, preferably in the spring and fall. Keep the patched area clean by removing debris, leaves, and dirt that can trap moisture and lead to further deterioration.A gentle wash with a hose can help maintain cleanliness without damaging the patch. It is also advisable to inspect the surrounding areas of your roof, as adjacent shingles or tiles may affect the integrity of your patch. If you notice any loose or damaged shingles nearby, consider repairing those as well to prevent additional leaks. Lastly, apply a protective sealant over the patched area after a few months, which can provide an extra layer of defense against the elements. This will help to extend the lifespan of your repair and keep your roof in optimal condition.
When to Call a Professional
While many roof repairs can be tackled with a step-by-step guide to patching a roof, there are specific scenarios where it is wise to seek professional assistance. Understanding these situations can save homeowners from potential accidents and costly mistakes. If you notice extensive damage, such as multiple leaks or large sections of missing shingles, it may be time to call in the experts.A professional can assess the overall condition of your roof and determine if a full replacement is necessary rather than just patching. Additionally, if the damage is located in hard-to-reach areas, such as steep slopes or high elevations, hiring a contractor ensures safety. Professionals have the right equipment and training to handle such risks without compromising their safety. Another important factor is the age of your roof. If your roof is nearing the end of its lifespan and showing significant wear, patching may only be a temporary fix. In this case, a professional can provide you with options for replacement or major repairs. Lastly, if you feel unsure about your ability to complete the repair safely and effectively, it’s best to err on the side of caution.
Calling a professional can help you avoid further damage and give you peace of mind.
Understanding Roof Materials
When it comes to roof repairs, understanding roofing materials is crucial for selecting the right patching technique. Different types of roofing materials require specific approaches to ensure a successful repair. Here, we will explore the most common roofing materials and how they impact repair methods.Asphalt Shingles
are one of the most popular roofing materials due to their affordability and ease of installation. When patching asphalt shingles, it is essential to use the same type and color of shingles to maintain aesthetic consistency.The repair process typically involves lifting the damaged shingles, applying roofing cement, and replacing them with new ones.
Metal Roofing
is known for its durability and longevity. However, when it comes to repairs, metal roofs can be challenging. Patching a metal roof usually requires the use of metal flashing and sealant. It is important to ensure that the seams are properly sealed to prevent leaks.Tile Roofing
, often made from clay or concrete, is another common material that presents unique repair needs.Patching tile roofs involves carefully removing the damaged tiles and replacing them with new ones. Homeowners must take care not to crack adjacent tiles during this process.
Slate Roofing
is a high-end option known for its beauty and longevity but can be expensive to repair. When patching slate roofs, individual slate tiles must be removed and replaced without damaging surrounding tiles. This requires precision and often specialized tools.Flat Roofs
, commonly found in commercial buildings, typically use materials like EPDM or TPO.Patching flat roofs often involves applying a rubber membrane or adhesive patches over the damaged areas. Proper surface preparation is critical for ensuring the patches adhere effectively. In conclusion, understanding the different roofing materials is fundamental when it comes to patching a roof. Each material has its own characteristics that dictate the appropriate repair techniques. By choosing the right method based on your roofing type, you can achieve a durable and aesthetically pleasing repair.
Step-by-Step Patching Process
Step 1: Assess the Damage - Before you begin any patching, carefully inspect the roof to determine the extent of the damage.Look for missing shingles, leaks, or areas where water has pooled. Take note of any underlying issues that may need attention, such as rot or structural problems.
Step 2: Gather Your Materials
- Ensure you have all necessary materials on hand before starting the patching process. Common materials include roofing cement, patches (either shingles or rubberized material), a putty knife, utility knife, and safety equipment like gloves and goggles.Step 3: Prepare the Area
- Clear any debris around the damaged area. If there are any loose shingles or material, remove them carefully.Make sure the surface is clean and dry to ensure proper adhesion of the patch.
Step 4: Cut the Patch
- Depending on the type of patch you are using, cut it to size. For shingle patches, ensure the patch is slightly larger than the damaged area to allow for overlapping. For rubberized patches, make sure it covers the entire damage with some excess on all sides.Step 5: Apply Roofing Cement
- Using a putty knife, apply roofing cement to the area surrounding the damage. This will help seal the edges of your patch and prevent water from seeping in.Step 6: Install the Patch
- Carefully place your patch over the damaged area, ensuring it is centered and aligned properly.Press down firmly to secure it in place, ensuring that it adheres well to the roofing cement.
Step 7: Seal the Edges
- Once the patch is in place, apply an additional layer of roofing cement around the edges. This will provide an extra barrier against moisture and help secure the patch further.Step 8: Inspect Your Work
- After allowing the patch to set according to manufacturer instructions, inspect your work. Ensure that there are no gaps or loose edges. A thorough inspection will help prevent future leaks.Step 9: Clean Up
- Dispose of any debris and leftover materials properly.Cleaning up your work area not only keeps your property tidy but also ensures safety for yourself and others.
Step 10: Monitor for Future Issues
- After completing your repair, keep an eye on the patched area over time. Regular inspections can help catch any new issues before they become major problems.Essential Tools for Roof Patching
Before embarking on your roof patching project, it is crucial to gather the right tools and equipment to ensure a smooth and safe repair process. Having the appropriate tools at your disposal not only makes the task easier but also helps to achieve a professional finish. Below is a list of essential tools and safety gear needed for effective roof patching.1.Safety Gear:
Your safety should always come first when working on a roof.Essential safety gear includes:
- Hard Hat: Protects your head from falling objects.
- Safety Goggles: Shields your eyes from debris and materials.
- Non-slip Shoes: Ensures better grip on the roof surface.
- Harness and Lanyard: Provides fall protection when working at heights.
- Roofing Hammer: Specifically designed for driving nails into roofing materials.
- Tape Measure: Essential for measuring sections of the roof accurately.
- Utility Knife: Used for cutting roofing materials such as shingles or underlayment.
- Nail Puller: Useful for removing old or damaged nails.
- Shingle Scraper: Helps in removing old shingles efficiently.
- Patching Material: This could be roofing cement, shingles, or other waterproofing materials.
- Nails or Fasteners: Ensure you have the right type for your roofing material.
Don't wait until small issues become costly repairs—start patching today!.


